Sunday, May 31, 2009

And the winner is....

Last weekend I posted the guidelines for the Easy Bake Oven giveaway. And I've enjoy reading all the posts about your favorite childhood toys...Easy Bake Ovens, Light Brites, the Snoopy Sno Cone machine, and record player...all were great toys! I had nearly all the ones listed, too. Good times, good times!

Over the week, sous chef Shelby and I charted the followers, commenters and those who linked to the contest, plus the number of entries each lovely player earned. We threw all the names into a charming white wicker basket, and drew out a lucky winner. It was a wonderfully exciting day at Lightbulb Cuisine!


Sous chef Shelby drawing a name.

And our winner is...


HEIDI!!

Heidi, email you address, and I'll have our friends at Hasbro send your fabulous Easy Bake Oven! (I hope you will blog about it!) Congratulations!!

Wasn't that fun? Thanks to all who entered and shared your favorite childhood toy. It was nice to see some new faces, too. Welcome! And it was nice to pick up a few new followers as well.

Have a delightful week! And stay tuned for more recipes.

Love, Cookie B.

Friday, May 22, 2009

Easy Bake Oven Giveaway!

This is an exciting day for Lightbulb Cuisine! Our friends at Hasbro have offered up an Easy Bake Oven for one lucky reader, in honor of their recent "Baker of the Year" contest. Is that not the best news you've heard all day?

That's it on the right. Isn't it gorgeous?! --->

Here's the 4-1-1 on the EBO giveway guidelines...

1. Post a comment and tell me about your very favorite childhood toy. (Cue..."Memories, from the corners of my mind...") That gets you 1 entry!

2. Create a post about the giveway on your blog and link back to mine (email me your link so I can see it!), and you'll get another 2 contest entries.

3. Follow me and get another 2 entries.

You could get a total of 5 contest entries. Easy, right? And definitely worth the effort!

Sous chef Shelby will throw all the entries into a hat and draw a winner in one week.

Good luck! And don't forget to comment/blog/follow!

Love, Cookie B.

Wednesday, May 20, 2009

A genuine award-winning recipe!

My friends at Hasbro have recently completed their annual Easy Bake "Baker of the Year" contest. Seven finalists from around the country gathered in Orlando, FL, for a super-delicious bake off. This year's contest winner is master chef Catherine Ralston, 12, of New Albany, Ohio. Her winning entry was the "Queen of Hearts Strawberry Tart." Catherine is featured here with sous chef, Terry Ralston, and her scrumptious heart tart. Mmmmm!

Bakers had to create an original recipe using an Easy Bake mix, plus their own ingredients. Lightbulb Cuisine is uber lucky to have gotten its hands on the winning recipe, and I have featured it here for you! Isn't that exciting?!

For the Queen of Hearts Strawberry Tart, you will need:
  • cooking spray
  • 1 package-Easy-Bake Sugar Cookie Mix
  • 3/4 teaspoon- water
  • 1/8 teaspoon- lemon extract
  • flour for hands
  • 2 teaspoons- lemon curd
  • 9 thin slices- strawberry (outer red slices, from small strawberries-enough to cover tart)
  • jumbo pink, white and red heart sprinkles
  • small white doily to put tart on
Prep Instructions:
Heat Easy Bake Oven for 15 minutes. Spray round baking pan with cooking spray. Blend sugar cookie mix, water and lemon extract in a small bowl. Lightly flour your fingers. Spread batter in baking pan evenly, taking care not to come up on sides of pan.

Baking Instructions:
Place pan in Easy Bake Oven baking chamber. Bake for 13 minutes. Cool for 10 minutes in cooling chamber. Run a knife around edge of pan to loosen cookie. Turn out onto plate. Use a heart shaped cookie cutter (3 inches across by 2 1/2 inches long) to cut a heart shape. It should take up most of cookie round. Spread top of heart with lemon curd and decorate with strawberries following heart pattern, in a single layer. Tuck in sprinkles on tart, decoratively, as desired. Place doily on a small plate and top with tart. Yummy!

And there you have it...an award-winning recipe. Congrats to you Catherine! That's Easy Baking!

Love, Cookie B.
P.S. Watch Lightbulb Cuisine for the upcoming contest. We'll be giving away an Easy Bake Oven! You won't want to miss it.

Tuesday, May 5, 2009

It's time for a FIESTA!

It's Cinco de Mayo, so what a tremendous time for a Mexican feast. Don't you agree?!

Here at Lightbulb Cuisine, we think the beauty of Mexican fare is that all the elements are interchangeable. The meat, beans, tomatoes and cheese all get along in any combination. It's all good. So please feel free to go crazy with your combinations!

In an earlier entry, I mentioned reserving leftover meats. Today's fiesta is a perfect excuse for using up those leftovers. Grab the chili, the ground beef, the chicken...you name it! Today's fiesta features nachos, bean dip and chili quesadillas. Ole!

Nachos
Sprinkle some grated cheddar and/or monterey jack on tortilla chips and pop them into the oven until the cheese is melted.

Bean Dip
Fill a melting cup with refried beans and place on the warmer and cover. Heat throughout. Top with cheese and alow to melt.

Quesadillas
Preheat the oven for 15 mitnues. Spray a pan with oil and layer in a soft tortilla shell; a tablespoon of leftover chili or seasoned groud beef or spiced chicken; grated cheddar and/or monterey jack; and finally another tortilla. Bake in the oven for 5-10 minutes, or until the tortillas are crisp. Remove from oven an sprinkle with a pinch of cheese and allow to melt. Cut into triangles.

Serve with guacamole and enjoy! Es bueno!
That's Easy Baking!
Love, Cookie B.

Saturday, April 18, 2009

It's tea time!

Ring-a-ding-ding! My goodness, look at the time. Would anyone care for a spot of tea?

Today at Lightbulb Cuisine, we're hosting a tea party. We have some tasty little grahams dipped in chocolate to go with your afternoon pick-me-up. Whether you choose herb or caffeinated, your tea won't be lonely with these snazzy biscuits.

For the tea biscuits you will need:
  • Graham cracker sections
  • Hershey's Kisses
  • Sprinkles and/or colored sugar
Place some Hershey's Kisses (white and milk chocolate) into the warming cups and place on the warming tray. Cover. Stir occasionally as the chocolates melt. Experiment with the chocolate dips and sprinkles. I like to dip the grahams into the milk chocolate and then into the white chocolate. You will need to allow the milk chocolate to harden before dipping in into the white, or you'll end up with a swirly chocolate mess.

Your little darlings will love to make different chocolate and sprinkle combinations. Refrigerate your finished product so that they harden faster. Once they're ready to eat, pour yourself a cup of tea and enjoy!
That's Easy Baking! How do you take your tea? (Or coffee?)

Pip pip, Cookie B.

Wednesday, April 15, 2009

Wake up, sleepyheads!

Breakfast is touted as the most important meal of the day, and the chefs here at Lightbulb Cuisine couldn't agree more! So today, we're going to feature a breakfast-time favorite. Pancakes and bacon! Doesn't that sound magnificent? We thought so, too. Find your spatula and your eatin' pants because breakfast is on it's way!

For the pancakes, you will need:
  • 4 Tbsp. pancake mix
  • 4 Tbsp. milk
  • toppings of your choice
Preheat oven for 15 minutes. Grease pans. Stir together the pancake mix and milk. Pour into pans. Bake for 15 minutes. Serve with your favorite pancake toppings of your choice and enjoy! Makes two pancakes.

Strips of precooked bacon from the refrigerated section in your grocer's store can be cooked for 2-4 minutes.

And there you have it! A satisfying breakfast! Don't leave home without it.
As shown, blueberry syrup with whipped cream and a strawberry.

That's Easy Baking! Now get on with your day.

Love, Cookie B.

Tuesday, April 14, 2009

A big, bright "thank you"!

At this juncture, it is imperative that I give a big Lightbulb Cuisine SHOUT OUT to Ms. Peggy. Without whom, none of this would be possible. You are the light behind this oven! I bow to you.

Love, Cookie B.

Saturday, April 11, 2009

Happy Easter!

We're terribly fond of themed events here at Lightbulb Cuisine, so to us, holidays are the bees knees! And this fluffy bunny cake is the pièce de résistance for any Easter feast. Don't load up on ham and potatoes, because this coconut cake is a crowd pleaser.

For the coconut cake you will need:
  • 2 tsp. shortening
  • 4 tsp. sugar
  • 6 teaspoons milk
  • 1/4 teaspoon coconut extract
  • 1/4 tsp. baking powder
  • dash salt
  • 6 teaspoons flour
For the finishing touches you will need:
  • prepared vanilla or cream cheese frosting
  • shredded coconut
  • candies, fruit and colored sugar to decorate
Preheat oven for 15 minutes. Grease and flour two Easy Bake pans. Cream together shortening and sugar. Stir in milk and vanilla. Add baking powder, salt and flour. Mix well until batter is smooth. Pour into prepared pans. Bake each for 12 to 15 minutes or until sides separate from pan. Cool and remove from pans.

Cut one cake into the ears and bow tie shapes as shown. Frost cakes and sprinkle with coconut. Add candies to decorate and voila! A whimsical bunny cake fit for a fabulous Easter feast!

That's Easy Baking!

Have a wonderful holiday! Love, Cookie B.

Friday, April 10, 2009

Ultimate Leftover Meal

Sadly, on the east coast, we're still showing signs of winter. And mark my words, I'm none too happy about it. However, it does give me the chance to pull out at least one more wintry comfort food at Lightbulb Cuisine. And today, it's shepherd's pie! Scrumptious!

As part of my must-have items, I mentioned tossing leftover meats into the freezer for later use. This recipe is perfect for leftover ground beef. Additionally, you can get rid of those leftover mashed potatoes and little bowls of assorted veggies. So grab your leftovers, and let's start cooking!

For shepherd's pie, you will need:
  • 2 Tbsp. ground beef
  • 2 Tsp. cream soup (I prefer cream of celery or onion)
  • Sauteed onion or onion powder
  • Leftover veggies (I like corn and string beans)
  • 2 Tbsp. mashed potatoes
  • Grated cheddar cheese
Preheat oven for 15 minutes. Grease pan. In a bowl, mix beef and soup. Spread in pan. Layer on veggies, onion or powder, potatoes and grated cheese. Bake for 15 to 20 minutes. Cheese should be nicely melted and the potatoes should be browned around the edges. Serve hot and enjoy!
This is a favorite cold weather meal at Chez Brochette. The house gets warm from the oven use and everything smells divine. You can lower calories and fat by using ground turkey, low-fat soup, and low-fat cheddar. It's up to you!

That's Easy Baking!

Love, Cookie B.

Thursday, April 9, 2009

The EBO: A Celeb Favorite

Straight from the pages of People magazine! They asked a number of celebrities, "What was your favorite childhood toy?" and it should come as no surprise that the highly coveted Easy Bake Oven was on the list.

Says Garcelle Beauvais-Nilon:
"Easy Bake Oven. I loved mixing the cake batter and seeing it rise through the window, then eating it with my friends. It was a girlie thing to do."

A fabulous endorsement! What was YOUR favorite childhood toy?

Love, Cookie B.

Tuesday, April 7, 2009

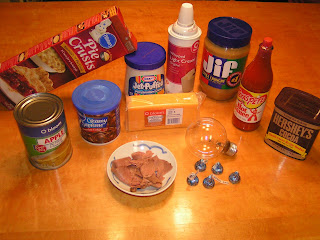
What's in your cupboard?

I was recently asked about good on-hand items to have in the kitchen when cooking with an Easy Bake oven. I've given it some thought, and I've come up with a dozen handy items to have when a snack attack arises. Got your note pad? Because here we go...

12 Things Every Easy Bake Chef Needs in the Kitchen
  1. Frosting. Remember the song, "If I knew you were coming I'd have baked a cake"? Well when you have frosting, all the typical cake-baking ingredients and an Easy Bake oven, you can have a fast, fabulous cake in under half an hour!
  2. Cocoa. It's a quick and easy way to turn any cookie or cake recipe into a chocolate masterpiece.
  3. Marshmallow fluff. When melted on the warming tray, the fluff has a number of sweet options for your little ones.
  4. Peanut butter. See the peanut butter fudge recipe below. You know you want it!
  5. Pie crust. Either a boxed mix or refrigerated, it doesn't matter to me. But a pie is always a fun, fancy dessert!
  6. Pie filling. See fun, fanciness above.
  7. Cheeses. Cheeses melt nicely in the Easy Bake oven, and make every meal extra savory.
  8. Whipped cream. This makes an easy topping for pie, strawberry shortcake, brownies or some cake.
  9. Texas Pete. I like things spicy, and this is a tasty way to add some zip.
  10. Hershey's Kisses. Can you say...chocolate fondue?!
  11. Leftover meats. There are a number of Easy Bake recipes that call for browned ground beef, sausage or chicken. If you have some leftover from a meal, throw them in a Ziploc and into the freezer.
  12. An extra 100 watt bulb. One never wants to be in the dark!
So there you have it, my Lightbulb Cuisine can't-live-without Easy Bake necessities. Notice I didn't mention ingredients such as flour, salt, sugar, and so on. Those are a given. Every fine chef already has the basics. These are things you'll want to have in order to make your Easy Baking super special!

What's an ingredient in YOUR kitchen that you can't live without?

Love, Cookie B.

Monday, April 6, 2009

It's not always "Easy"

There are rare days when things don't always go as planned at the Lightbulb Cuisine test kitchen. Once in a great while they go horribly wrong.

Sous chef Shelby and I were trying our collective hand at hash browns in the Easy Bake oven. We like ours crisp with onion and ground pepper. Mmmm! But sadly, our hearts were broken today. It seems that the fiery hot bulb is no match for a starchy tuber. As you can plainly see, what we ended up with was a dried out, graying mass of distasteful-looking shredded potatoes.

Blech. :-P

I decided to go ahead and write about it, not because I'm proud of our failure today, but to demonstrate that even the finest chefs have kitchen catastrophes. How you overcome is the key to culinary success. Sous chef Shelby and I resigned ourselves to heavenly hash browns on the range instead. Pass the ketchup!

Any kitchen catastrophes you'd like to share?

Love, Cookie B.

Friday, April 3, 2009

Oh, FUDGE!

It's Friday and the start of spring break here at Chez Brochette, so we're going to start the festivities with a scrumptious candy confection. We're anxious to celebrate our week of freedom, and this quick peanut butter fudge is just what Cookie ordered! If you're eager to get your chocolate in my peanut butter, then take notes...

For the peanut butter fudge, you will need:

  • 6 tsp. peanut butter
  • 1 cup powdered sugar
  • 5 tsp. milk
  • 1 tsp. Butter, softened
  • 1/2 tsp. vanilla
  • 4 tsp. cocoa

Preheat oven for 15 minutes. Place peanut butter in warming cup, and place on warming tray. Cover. Line two baking pans with foil, pressing the foil tightly into corners. After it has cooled, the fudge will easily lift out of the pans via the aluminum foil. Other recipes tell you to grease the pans, but who wants greasy fudge? Not I! So use the foil. Take my word for it.

Mix sugar, milk, butter, vanilla, and cocoa until smooth and creamy. You'll want all the ingredients to be well blended, so that you can fill your baking pans with ease. Because this darlings, is where it gets tricky. Please try to follow along. You'll essentially be using the chocolate mixture in fourths.

Spoon one quarter of your mixture into each pan. Drizzle the peanut butter onto each pan over the chocolate layer, ensuring that each pan has 3 teaspoons. Spoon the remaining chocolate mixture over the peanut butter layers. Tap the pans lightly on the counter to level.

Bake each pan 5-7 minutes. Allow to cool. If you can hardly wait to sample your delicious fudge, pop your pans into the fridge to cool. That's what we do here at Lightbulb Cuisine. How can you not resist devouring your fabulous fudge ASAP! After cooling, lift foil and fudge out of the pans and cut into 6 wedges per pan. If you enjoy fudge as much as I, than this recipes serves...one. LOL

That's Easy Baking!

Love, Cookie B.

Wednesday, April 1, 2009

Live, from the Lightbulb Cuisine Test Kitchen

A special live welcome message for new visitors...

Thanks to Candice of Life According to Candice, I've discovered another outlet for killing time. I may have to give up cooking for video production.

Do you want to make fabulous movies? Check out http://www.xtranormal.com/

That's a wrap!

Love, Cookie B.

Monday, March 30, 2009

FEED THE PEEP!

Oh dear. This poor peep did not respect the light bulb. Clearly, he didn't realize that Easy Bake ovens are not a toy. This is precisely why adult supervision is required. He must have fallen headfirst into the oven, and baked right along with the fettuccine marinara. So we bid a sad adieu to sweet peep number three, row two.

~ ~ ~ ~ ~ ~ ~ ~ ~ ~ ~ ~ ~ ~ ~ ~

Hahaha! That was fun. Don't you agree? If you'd like to participate in Savor the Thyme's “Feed the Peep” contest, see contest rules here. Hurry! The contest ends April 5.

Good luck!

Peep-peep, Cookie B.

Friday, March 27, 2009

OH, THE MADNESS!

As any basketball fan knows, we're well into March Madness and the NCAA bracketology. Before too long, we'll be heading down the road to the Final Four. And there's no better way to watch the games than with good friends and good food. Tired of the same ol' pizza delivery? How about delivering pizza DIP to your hungry NCAA fans?!

Our pizza dip is a layered masterpiece of perfection – smooth seasoned cream cheese, tangy tomato sauce, spicy pepperoni, and stringy mozzarella. Mmmmm. Sous chef Shelby and I promise it won't last long!

For the pizza dip, you will need:

  • 2 Tbsp. cream cheese, softened
  • 2 tsp. sour cream
  • 3/4 tsp. Italian seasoning
  • dash garlic powder
  • 1.5 Tbsp. pizza sauce
  • 3 slices of pepperoni, diced
  • mozzarella cheese

Preheat oven for 15 minutes. Combine first four ingredients in a bowl; spread into pan. Spread on the pizza sauce. Top with pepperoni and a sprinkle of mozzarella. Bake for 15 minutes. Enjoy warm with corn chips or tortilla chips.

Here at Lightbulb Cuisine, we prefer the corn chips. The dense corn goodness makes a hefty scoop for our creamy pizza concoction. But don't just take our word for it. Try some of each!

That's Easy Baking!

Love, Cookie B.

Wednesday, March 25, 2009

AWW MOM, CHICKEN AGAIN?!

Does the original white meat make a regular appearance in the dinner rotation at your house? If you're like most families, I suspect it does. So I'm positive you'll want to stand by for today's amazing Easy Bake creation – barbecue chicken cheddar pockets!

These easy fold-overs are a snap to make and are a great alternative to ho-hum chicken. And what's more, they are perfect for using up leftovers. So grab that rolling pin and let's get going!

For barbecue chicken cheddar pockets you will need:

  • 1/3 cup Betty Crocker pie crust mix
  • 4 tsp. Water
  • Barbecue sauce
  • Cooked chicken
  • Cheddar cheese

Preheat oven for 15 minutes. Combine pie crust mix and water with a fork until it forms a stiff dough. Divide into two balls and roll out each separately. Spread each round with barbecue sauce. Place chicken and cheddar on one half. Fold other half over and pinch edges to close. Spray cooking pan with veggie oil and bake for 20 minutes. Yield 2 pockets.

Our favorite barbecue sauce here at Lightbulb Cuisine is Sweet Baby Ray's hot 'n spicy blend. We like to say a barbecue wouldn't be complete without our old friend Ray!

Cluck, cluck....that's Easy Baking!

Love, Cookie B.

Monday, March 23, 2009

SNICKERDOODLES

It's time to dust off that cream of tartar, because we're having snickerdoodles!

That's another fun word, don't you think? Snickerdoodles. Fun to say and fun to eat! And with snickerdoodles being one of the few reasons to even own cream of tartar, why not pull it out today and bake some cookies for the family? I think you'll agree it's a magnificent way to start the week. Heck, just say the word snickerdoodles a few times and you won't be hating Mondays nearly as much!


Cinnamon-sugar coating:

  • 3/4 tsp. white sugar
  • 1/4 tsp. ground cinnamon
For the snickerdoodles, you will need:
  • 1 Tbsp. butter, softened
  • 1 Tbsp. shortening
  • 3 Tbsp. white sugar
  • 1 Tbsp. egg
  • 1/4 tsp. vanilla extract
  • 1/3 cup all-purpose flour
  • 1/4 tsp. cream of tartar
  • 1/8 tsp. baking soda
  • 1/8 tsp. salt


Preheat oven for 15 minutes. Make the cinnamon and sugar coating; set aside. Cream together butter, shortening, sugar, egg and the vanilla. Blend in the flour, cream of tartar, soda and salt. Refrigerate dough until firm. Shape dough into small balls. Roll balls of dough in cinnamon-sugar mixture. Place dough balls in greased baking pan. Bake 8 to 10 minutes, or until set but not too hard. Remove immediately from baking sheets.

These precious little white cookies, with their cinnamon sugar coating, are sure to sweeten your week. Have a good one!


That's Easy Baking!

Love, Cookie B.

Friday, March 20, 2009

IT'S FRY-DAY!

Hallelujah! The end of the work week is upon us. And what better way to unwind than with a happy-hour snack? Today, Lightbulb Cuisine is serving up French fries! So pour yourself a cocktail and let's have some spuds.

I like my fries sprinkled with Tony Chachere's creole spices. The spicy zip of the fries complimented by sweet, tomato-y ketchup is heavenly.

What you'll need for fry-day fries:

  • French fries
  • Tony Chachere's creole spices
  • A cocktail

Preheat the oven for 15 minutes. Spray the bottom of the pan with oil. Pop the fries into the pan and slide the pan into the oven. Bake for 30 minutes. Move the pan to the cooling chamber, and start another pan to crisp. Continue until enough is enough. Or until your cocktail is finished, and you need to have a little lie down.

That's Easy Baking! Have a wonderful FRY-DAY.

Love, Cookie B.

Thursday, March 19, 2009

THE REAL ESSENTIALS

As all great chefs know, having the proper tools is essential. Even the Gods as Hasbro are aware of that. They have designed and successfully marketed a line of “Easy Bake Essentials.” For us at the Lightbulb Cuisine test kitchen, we have our own “essentials.”

Not a day goes by when sous chef Shelby or I don't clamber for the Williams-Sonoma mini rubber scrapers. These handy gadgets are the center of our stirring universe. When we need to get every smudge of tasty batter or dough out of a mixing bowl, we wouldn't dream of scraping with anything else.

Another of our kitchen faves is the mini whisk. When we need to whip a mixture into a fine froth, the mini whisk is our special go-to gadget.

And when we need to combine all those many teaspoons of ingredients, we find the Pampered Chef measuring spoons to be an indispensable essential. An inseparable indispensable essential even!

Would a golfer hit the links with a hockey stick? No! And you shouldn't use sub-par cooking tools. So don't bother messing about with your Easy Bake oven if you're ill equipped to take on the task at hand. Use my recommendations or find your own equivalents, so you, too, can bake easy!

Love, Cookie B.

Tuesday, March 17, 2009

HAPPY ST. PATRICK'S DAY

With a name like Cookie Brochette, I'm clearly not Irish. But who can pass up an opportunity to celebrate a holiday with a festive theme meal? Definitely not the leprechauns at Lighbulb Cuisine!

St. Patrick was credited with converting the Irish to Christianity. Someday I hope to be made a Saint as I convert all my beloved readers to Easy Bakers. Can't you just see it now? St. Cookie. How fabulous!

In honor of St. Patrick, we're going to use a little Luck O' the Easy Bake and whip up some mouth-watering Reuben sandwiches. You can't go wrong on St. Paddy's Day with corned beef and cabbage! So set aside your green beer, and let's prep some sandwiches. Shall we?

Let me say up-front, most recipes for Reubens call for rye bread. I actually prefer a marble rye. It's visually pleasing AND it blends the delicious flavors of rye and pumpernickel. (Isn't that a fun word? Pumpernickel.)

For the Reuben sandwiches you will need:

  • Corned beef
  • Swiss cheese
  • Sauerkraut
  • Thousand Island dressing (dijon is acceptable, if you prefer mustard)
  • Marble rye bread

Preheat oven for 15 minutes. Scoop sauerkraut into a warming cup, and place on the warming tray. Cover. On each slice of bread, spread thousand island dressing. On one half, top with corned beef. Slide into oven and bake for 5 minutes. On the other slice of bread, top with shaved swiss cheese. After the beef half is done baking, slide in the cheese half. Bake for five minutes. After both halves of the sandwich have been cooked, assemble with sauerkraut. Eat, and enjoy!

Let me tell you, this sandwich turned out better than sous chef Shelby or I could have dreamed. It was crisp, with a savory blend of melted cheese and beef, set off with a pleasant hint of vinegar from the sauerkraut. An unbelievable taste bud extravaganza!

That's Easy Baking!

Erin Go Braugh, Cookie B.

Saturday, March 14, 2009

HAPPY PI DAY!

It's is a very special day in sophisticated mathematic circles. Or should I say...
circumferences? Hahahaha. Math humor!

Today is Pi Day. The date 3.14 is celebrated among cerebral academics 'round the world. And what better way to acknowledge Pi than with some pie? Here at Lightbulb Cuisine, we wouldn't have it any other way!

I realize this is short notice, as Pi Day isn't generally top-of-mind awareness, so we're going to do a quickie pie with pre-made ingredients. You might have some of these items on hand, so all the better! The Lightbulb Cuisine test kitchen had a can of blueberry pie filling, so that's what we prepared for Pi Day. I think you'll also really enjoy the splendid presentation when we're through.

For blueberry pie, you will need:

  • 1/3 cup Betty Crocker pie crust mix
  • 4 tsp. water
  • 2 tbsp. blueberry pie filling

Preheat oven for 15 minutes. Prepare pie crust with mix and water, stirring with a fork until you get a nice round dough ball. Divide the dough in half. Roll out two crusts to fit the pan. Lay one crust into pan, and press to fit. Spoon in the pie filling. Lay other crust on top, and pinch the edges. Bake for 25 to 30 minutes. Move to cooling chamber until it's cool enough to handle the pan.

Serve with ice cream, whipped cream, or just as-is for you pie purists.

That's Easy Baking!

Love, Cookie B.

Friday, March 13, 2009

PREHEATING: AN ABSOLUTE NECESSITY

You will notice when I prepare a baked item inside the Easy Bake oven -- as opposed to on the warming tray -- I instruct readers to preheat the oven. It it my great hope that you do not choose to disregard this piece of sage advice.

Whenever you begin to bake, it's always important to preheat the oven. Especially the Easy Bake! You never want to shove in a batch of brownies or a pan of zitis into a cold Easy Bake oven. It's a rookie move and you could end up with food that is burned on the bottom, yet lukewarm on top. An Easy Bake should always be preheated for 15 minutes prior to use. This time is not negotiable. The fiery hot light bulb needs to reach a proper temp before baking. So plug it in, prep your items and cook with ease!

Love, Cookie B.

Wednesday, March 11, 2009

STRAWBERRY SHORTCAKE FOR FOUR

Berries are coming into season. Can I get a “hurray”?! Who among us doesn't adore a luscious strawberry shortcake? I know I do. And with a little pre-planning, you can, too!

Have you ever been looking for just the right dessert for a garden party, or a bridal shower? I think strawberry shortcake is just that dessert – a sweet biscuit cake, ripe red berries, and a nice thick cream. Mmmm! I'm all a-twitter just thinking about it! So let's get started.

For the shortcake, you will need:

  • Heaping 1/2 cup baking mix
  • 3 tbsp. milk
  • 1 tsp. sugar

Toppings:

  • Sliced strawberries
  • Whipped cream

Preheat oven for 15 minutes and grease round baking pans. Combine shortcake ingredients in a bowl. With a fork, mix well to form a thick dough. Using greased fingers, divide the dough into four portions. Press one portion of dough into pan to cover the bottom. Bake for 12-13 minutes. Move to the cooling chamber and start another pan.

After cooling, layer on strawberries and whipped cream as shown. Eat and enjoy! For extra moisture on the cake, you can make a strawberry sauce by pureeing a handful of berries with a smidge of water. For that extra special touch, serve with a nice dessert wine. Fancy!

That's Easy Baking!

Love, Cookie B.

Monday, March 9, 2009

SNACKS WITH BITE

This seems like as good a time as any to note that the Easy Bake oven isn't just for cakes and cookies. It's perfect for after-school snacks, made with love!

Today, I'd like to spice things up with some kicky Buffalo chicken nuggets. Doesn't that sound magnificent?! Why serve up dry crackers or a boring apple after school when you can whip up a warm, zesty snack for your little darlings? For this recipe, you should really use the refrigerated nuggets. Because after all, we don't need to wait all afternoon for frozen nuggets to cook. You'll spoil your dinner! The refrigerated variety will allow you to fix a tasty snack in a jiffy.

For the Buffalo chicken nuggets, you will need:

  • Refrigerated chicken nuggets
  • Texas Pete, or other hot wing sauce
  • Side of celery strips
  • Side of ranch or clue cheese dressing

Preheat the oven for 15 minutes. Spray a pan with cooking oil and lay out your nuggets. Brush with wing sauce. Bake for 15 minutes, then move the pan to the cooling chamber while you heat another batch of nuggets.

Nuggets are delish with ranch or blue cheese dip. Eat a celery strip if you need to cool your mouth from the spicy wing sauce!

That's Easy Baking!

Love, Cookie B.

Sunday, March 8, 2009

A PEEL BY ANY OTHER NAME...


...is just gauche.

According to the printed instructions, the cooking device that loosely resembles a shuffleboard cue, and is used to navigate food into and out of the oven, is called a “pan pusher.”

As members of the Easy Bake elite, do we even need to discuss the myriad reasons for why this is wrong? For simplicity sake, let's just say it's bourgeois. Everyone knows that a pusher is someone who tries to sell you drugs on the street like a common criminal. Calling this necessary cooking tool a pan pusher is terribly unprofessional. No one at The Rainbow Room or Le Cirque calls this type of item a pan pusher. The slovenly staff member who carelessly thrusts desserts and baked goods into an oven might be known as the pan pusher, but the device itself is known as a peel in the culinary world, as everyone knows. Henceforth, let this essential Easy Bake gadget be known as the peel.

Happy baking!

Love, Cookie B.

SPRING IS ON THE WAY

So it's time for pinwheels!

Not the old fashioned child's toy, but something I'm sure you'll think is just as joyous. Pinwheel cookies!

Now don't panic and go thinking this is a difficult ordeal. Pinwheel cookies aren't as odious as they look. Especially if you use the prepackaged mixes from our primo chefs at Chez Hasbro. We don't often use mixes here at Lightbulb Cuisine, but when they come with the oven, you might as well do something special with them!

In future installments, I will post homemade recipes for both mixes. Because after all there's nothing better than fresh, homemade cookies!

For pinwheel cookies, you will need:

  • One package of chocolate cookie mix
  • One package of sugar cookie mix
In two separate mixing bowls, stir a teaspoon of water into a chocolate cookie mix, and a sugar cookie mix. Stir well until the mixes are thick and can be rolled into a ball. On a floured surface, roll out two separate rectangles of equal widths, lengths and thicknesses.

You may find that one of the dough mixes produces a more pliable rectangle than the other. It happens sometimes. If this is the case, then the more pliable dough sheet should be the bottom layer. Place the other rectangle on top, and gently roll the double decker layer into a log. Be sure to flour your fingers so the dough doesn't stick to you. It won't do you any favors when you try to roll. Slice into sections as shown, and put several cookies onto a cookie sheet.

Using the pan pusher, slide a tray of cookies into the oven. Bake for approximately 10-12 minutes. Oven temps may vary. Do not overcook! The sugar cookie stripes should NOT turn brown. If they do, they're overdone and will be hard as hockey pucks. When the cookies are done, advance the cookie tray into the cooling chamber, and start a new tray of cookies to baking.

Pinwheel cookies are delicious AND whimsical. Your guests will be impressed with the effort you have shown in your entertaining!

That's Easy Baking!

Love, Cookie B.

Saturday, March 7, 2009

RESPECT THE LIGHT BULB

This entry is essentially your Easy Bake Oven Safety 101. The oven packaging cautions users on a number of fronts. These dangers are not to be taken lightly. We're talking 100 watts of raw heating power! Do any of us really know how fiery that is? Let me tell you, it must be scorching because the operator's manual lists “HOT” twice in the safety precautions. TWICE! The pans will be hot and the oven itself will be hot, as the instructions plainly state. When moving items into the oven and on through to the cooling chamber, the pan pusher must be utilized. You must respect the light bulb at all times. Please know that fingers do not make all that good of a pan pusher.

Consider yourself warned to this clear and present danger. When you follow all operating instructions to the letter, you'll bake easier and happier!

Love, Cookie B.

THE WARMING TRAY

Before launching full-bore into recipes and trade secrets of the Easy Bake aficionados here at Lightbulb Cuisine, let's begin slowly with treats from my favorite heat source – the warming tray. And what better way to kick off a cooking blog, than with a fondue?! Fondues are always a family favorite.

The warming tray is perfect for creating fondues. And today we're going to do a fun chocolate-pretzel fondue. The chefs here at the Easy Bake test kitchen have chosen to do a combination of milk and white chocolates.

NOTE: In a future entry of Lightbulb Cuisine, I will discuss the importance of preheating the oven. That advice does not hold true for the warming tray. When producing a drizzle or a fondue, it is expected that you will warm the items slowly. So when doing a melt, there is no need to preheat.

For the chocolate-pretzel fondue, you will need:

  • Pretzels
  • Hershey's Kisses or milk chocolate morsels
  • Hershey's Cookies & Cream Kisses

I prefer to start with milk chocolate. Milk chocolate is a thicker melt, and is often messier for the amateur fonduer. White chocolate is thinner and easier to work with, hence it can be used to cover a mistake on mis-dipped pretzels.

You will need to place the unwrapped Kisses or morsels into the warming cup. Go ahead and fill it up! Live a little! Place the cup onto the tray, and cover with the warming dome. Plug in the oven. Stir the chocolate with a toothpick from time to time to ensure an even melt. Once the chocolate is ready, DIP! Scrape off the excess and place the pretzel on wax to cool. Continue until all the milk chocolate has been used. You might need to scoop and drizzle the chocolate as you near the bottom of the cup. Clean the cup, and repeat with the white cream Kisses.

I like to make a combo of all chocolate, all white cream, and a mix of the two. Remember the the black and white cookie from “Seinfeld”? Same principle. Simply dip half the pretzel into milk chocolate, let cool, and then dip into the white cream. It's beautiful and tasty! It helps if you pop the pretzels into the fridge for a few minutes to speed the chocolate hardening process.

Fondued pretzels make delicious after-school snacks for the kids or a lovely gift for a friend. If you're feeling adventurous, you can buy colored dipping disks to melt in the warming tray. Use your imagination and create chocolate pretzels for all occasions! Try sprinkles and colored sugars, too!

Stay tuned for other fabulous fondues.
That's Easy Baking!
Love, Cookie B.